
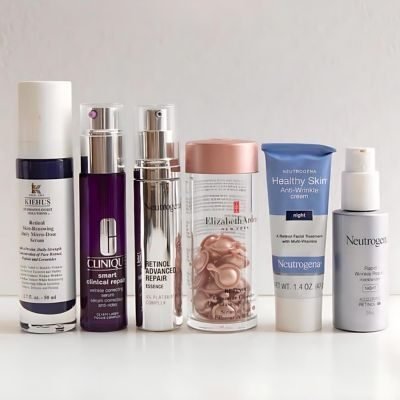
Disclosure: This post contains affiliate links, meaning if you make a purchase via the links, we will earn a commission at no additional cost to you. Please read the full disclosure. As I gracefully approach my thirties, I have become increasingly aware of the importance of taking care of my skin. I’ve always believed that prevention is better than cure, and when it comes to aging, this philosophy holds true. That’s why I’ve made it a point to start my anti-aging skincare routine early. By incorporating the right ingredients into my daily regimen, I’m confident that I can maintain a youthful and radiant complexion for years to come. Top scientifically proven anti-aging ingredients When it comes to choosing the best anti-aging ingredients for my skincare routine, I like to rely on scientific research and evidence. There are several ingredients that have been proven to be effective in the fight against aging, and I make sure to include them in my daily regimen. Retinol Retinol is one of the most well-known and extensively studied anti-aging ingredients. It is a form of vitamin A that works by promoting cell turnover and collagen production. This helps to reduce the appearance of wrinkles, improve skin texture, and even out skin tone. I only use retinol serum at night, as it can make the skin more sensitive to sunlight. Elizabeth Aden Retinol Ceramide Capsules Line Night Serum Kiehl’s Retinol Skin Renewing Daily Micro Dose Serum Clinique Smart Clinical Repair Wrinkle Correcting Serum Neutrogena Healthy Skin Anti Wrinkle Retinol Cream Neutrogena Retinol Night Face Moisturizer Peptides Peptides are another powerful anti-aging ingredient that I swear by. These small chains of amino acids help to stimulate collagen synthesis, which in turn improves skin firmness and elasticity. Peptides also have antioxidant properties, which help to protect the skin from free radicals and environmental damage. I apply peptide-rich serum at night and morning to reap the benefits. Night Repair Creme De La Mer Estee Lauder Re-Nutriv Ultimate Lift Eye Cream Estee Lauder Re-Nutriv Ultimate Lift Cream Vitamin C Vitamin C is a versatile anti-aging ingredient that I incorporate into my routine for its brightening and antioxidant properties. It helps to even out skin tone, fade dark spots, and protect the skin from environmental stressors. I use vitamin C serum every morning to give my skin a radiant glow and protect it from daily damage. SkinCeuticals’s C E Ferulic Obagi Professional C-Serum 15% Clinique Even Better Clinical Radical Dark Spot Corrector Clarins Bright Plus Advanced Brightening Serum Kiehl’s Clearly Corrective Dark Spot Solution Pro-Xylane Pro-Xylane is a patented ingredient that has been shown to have significant anti-aging effects. It helps to stimulate the production of glycosaminoglycans, which are essential for maintaining the skin’s hydration and firmness. Pro-Xylane also helps to strengthen the skin’s barrier function, which can become compromised with age. I look for this ingredient in my moisturizers and serums to keep my skin plump and youthful. Products with this ingredient tends to cost more than other ingredients, so I highly recommend you do your own research before purchasing. Dark Spot Solution SkinCeuticals Hyaluronic Acid Intensifier SkinCeuticals A.g.e. Interrupter Advanced Helena Rubinstein Prodigy Re-Plasty Age Recovery Night Cream How to choose the best anti-aging ingredients for your skincare routine With so many anti-aging ingredients available on the market, it can be overwhelming to choose the best ones for your skincare routine. Here are a few tips to help you navigate the vast array of options and select the ingredients that will work best for your skin: Know your skin type : Understanding your skin type is essential when choosing anti-aging ingredients. Certain ingredients may be more suitable for oily skin, while others may work better for dry or sensitive skin. Consider consulting with a dermatologist to determine your skin type and get personalized recommendations. Identify your skincare concerns: Take a close look at your skin and identify the specific concerns you want to address. Do you struggle with fine lines and wrinkles? Are you looking to improve skin texture or fade dark spots? Knowing your skincare goals will help you choose ingredients that target those specific concerns. Research the ingredients: Once you have identified your skincare concerns, research the ingredients that have been proven to be effective in addressing those concerns. Look for scientific studies and evidence to support the claims made by skincare brands. This will help you make informed decisions and avoid falling for marketing hype. Consider the concentration: The concentration of an ingredient in a skincare product can greatly impact its effectiveness. Look for products that clearly state the concentration of key ingredients, as this will give you an idea of how potent they are. Generally, higher concentrations are more effective, but they may also be more irritating to the skin. Start with lower concentrations and gradually increase if needed. Embracing the power of anti-aging ingredients for timeless beauty: Incorporating the right anti-aging ingredients into your skincare routine can make all the difference in maintaining a youthful and radiant complexion. Whether you opt for scientifically proven ingredients or embrace the power of natural remedies, the key is to start early and be consistent. By taking care of your skin and nourishing it with the right ingredients, you can age gracefully and unlock the magic of timeless beauty. So, why wait? Start building your anti-aging skincare routine today and reap the benefits for years to come. Your skin will thank you for it! Popular Articles All Post Dessert keto ferrero rocher May 3, 2024/ chocolate strawberry bite May 3, 2024/ Earl Grey Shortbread Cookies May 2, 2024/No Comments Apple Pie Ring May 2, 2024/1 Comment Soft Heart Chocolate Cookie May 2, 2024/2 Comments Plain Yogurt Cake May 2, 2024/3 Comments Newsletter JOIN OUR NEWSLETTER Email Address By subscribing, I consent to receive promotional emails from this site and agree with our privacy policy. Categories Beauty (4) Dessert (10) Digital (10) Favorites (17) Skin Care (6) Edit Template Don't Miss Best Anti-Aging Ingredients for Timeless Beauty Best Ordinary Products 2024 Mauve Lipstick Hues for a
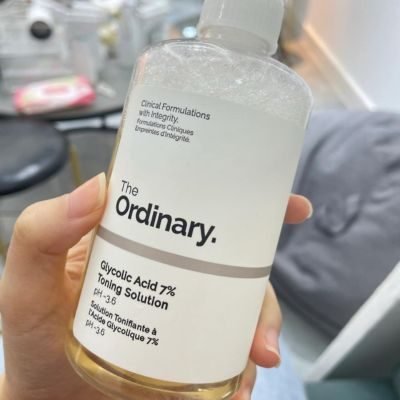
Best Ordinary Products 2024
Unveil your skin’s natural radiance with our curated selection of AHA, BHA, and hyaluronic acid-infused wonders. 🌟 Whether you’re looking to exfoliate, hydrate, or rejuvenate, we’ve got the magic potion for every skin type. Say goodbye to dullness and hello to hydration! ✨ Drop a 💧 if you’re ready to level up your skincare game.
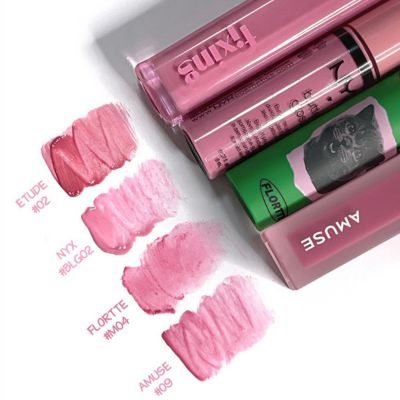
Mauve Lipstick Hues for a Chic Pout
Feelin’ fabulous in these mauve lip shades! 💄💋 They’re the perfect pop of color for any occasion. 😍 Whether you’re going for a natural look or want to make a bold statement, these mauve hues have got you covered. 💁♀️✨ Get ready to slay with #MauveMagic and turn heads wherever you go! 🔥🔥

best lipstick swatches of cherry blossom pink shades
🌸 Embrace your inner cherry blossom with the perfect pink lipstick 💄💕 This shade is blooming with confidence and femininity, making you feel like a true flower queen. 🌺💁♀️ Swipe on this petal-soft color and watch heads turn as you strut with unstoppable sass. ✨👑 Let your lips do the talking and show the world your vibrant personality. 😘💋 Get ready to slay the day with this must-have beauty essential! #CherryBlossomLips #PinkLipstickGoals #FlowerQueenVibes

White Nail Ideas 2024
As a nail enthusiast, I am always on the lookout for new and exciting nail ideas. One color that never fails to impress me is white. White nails are not only elegant and classy, but they also go well with any outfit and occasion. Whether you’re attending a wedding, going to prom, or simply want to add a touch of sophistication to your everyday look, white nail ideas are perfect for every occasion. In this article, I will share with you 28+ stunning white nail ideas that will inspire you to try something new and trendy. Let’s start with the classics. Classic white nail designs are timeless and versatile. They never go out of style and can be worn by women of all ages. One of my favorite classic white nail designs is the simple and elegant all-white manicure. This design involves painting all your nails with a solid coat of white nail polish. It’s clean, minimalistic, and perfect for any occasion. Another classic white nail design is the white and gold combination. By adding a touch of gold polish to your white nails, you can instantly elevate your look and add a touch of glamour. Whether you choose to paint all your nails gold or add gold accents to a few nails, this design is sure to turn heads. 1 10 5 11 7 15 20 White French tip nail ideas Another classic white nail design that deserves its own section is the white French tip. The white French tip is a timeless and sophisticated look that never goes out of style. It’s perfect for those who want to add a touch of elegance to their nails without going overboard. To achieve this look, start by painting your nails with a sheer nude or pink polish as a base. Then, using a white nail polish, carefully paint the tips of your nails in a curved shape, mimicking the natural shape of your nails. This creates a clean and polished look that is perfect for both everyday wear and special occasions 3 17 16 18 lifeadorable1 White nail ideas with nail art If you’re a fan of nail art, white nails provide the perfect canvas for your creativity. One popular white nail art design is the floral nail art. This design involves painting your nails with a solid coat of white polish and then using a fine brush to create intricate floral patterns. You can choose to paint a different flower on each nail or create a cohesive floral design across all your nails. Either way, your nails will look like a work of art. Another white nail art design that is gaining popularity is the negative space design. This design involves leaving parts of your nails bare and painting only certain areas with white polish. You can create geometric shapes, stripes, or even delicate lace patterns using this technique. The result is a modern and minimalist look that is perfect for those who want to make a subtle statement. 19 14 6 lifeadorable.com 21 23 25 White nail ideas for weddings When it comes to weddings, white nails are a popular choice among brides and bridesmaids. White nails symbolize purity, innocence, and elegance, making them the perfect choice for such a special occasion. One popular white nail design for weddings is the white lace nails. This design involves painting your nails with a solid coat of white polish and then adding delicate lace patterns using a fine brush or nail stamping plate. The result is a romantic and feminine look that complements any bridal gown. 22 24 26 nails Conclusion In conclusion, white nail ideas are versatile, elegant, and perfect for every occasion. Whether you prefer classic white nail designs, white French tips, or white nails with nail art, there is a design out there that will suit your personal style and preferences. So go ahead, experiment with different shades of white, add embellishments, and let your nails be the ultimate accessory to complete your look. Popular Articles All Post Beauty Skin Care best lipstick swatches of cherry blossom pink shades May 9, 2024/ White Nail Ideas 2024 May 9, 2024/ 9 Best Anti-Aging Face Creams 2024 Secret to Ageless Beauty April 22, 2024/6 Comments Age Gracefully: Unlock the Magic of Anti-Aging Ingredients for Timeless Beauty April 22, 2024/5 Comments 10 Best Concealers for a Natural and Confident Look April 22, 2024/No Comments 8 Best Serum Skin Products to unlock the Secrets to Radiant Skin in 2024 April 22, 2024/No Comments Newsletter JOIN OUR NEWSLETTER Email Address By subscribing, I consent to receive promotional emails from this site and agree with our privacy policy. Categories Beauty (3) Dessert (10) Digital (10) Favorites (17) Skin Care (4) Edit Template

keto ferrero rocher
Disclosure: This post contains affiliate links, meaning if you make a purchase via the links, we will earn a commission at no additional cost to you. Please read the full disclosure. Indulging in a delicious treat while staying on track with your keto lifestyle? Made with a combination of flaxseed powder, cocoa, and coconut oil, these keto-friendly Ferrero Rocher are seriously addictive. You won’t believe how closely they resemble the original, with their crunchy hazelnut center and rich chocolate coating. Plus, they’re low in carbs and packed with healthy fats, making them the perfect guilt-free indulgence. They’re easy to make and oh-so-delicious, you’ll never want to go back to store-bought chocolates again. So, grab your apron and get ready to experience keto-friendly chocolate bliss with these irresistible Ferrero Rocher. Get ready to win over your taste buds and impress everyone with your homemade delights. Why would you love this recipe for making keto ferrero rocher? Ferrero Rocher chocolates are a beloved confectionery made by the Italian brand Ferrero. With our keto friendly recipe, you will get a healthier vrsion Ferrero Rocher chocolates. Each Keto Ferrero Rocher consists of a whole roasted hazelnut encased in a creamy, hazelnut filling, surrounded by a flaxseed shell, and coated in chocolate and crushed hazelnuts. These chocolates are a decadent treat that appeals to chocolate lovers worldwide. Ingredients 60g flaxseed powder 80g sugar-free cocoa block 25g cocoa butter 30g coconut oil, melted 35g chocolate sauce powdered erythritol (or your preferred keto-friendly sweetener) 24 roasted hazelnuts Directions step 1 In a mixing bowl, combine the 60g flaxseed powder, 20g melted coconut oil, and powdered erythritol. Stir until the mixture forms a thick, dough-like consistency. step 2 Take a small portion of the dough (about 1 tablespoon) and flatten it in the palm of your hand. Shape it to a half ball shell in the mold. step 3 Frozen the flaxseed shells for 30 minutes and take them off from the mold. step 4 Fill one flaxseed shell with chocolate sauce and place a roasted hazelnut in the center. Fill another empty flaxseed shell with only chocolate sauce. step 5 Close the two flaxseed shells and gently forming a ball. step 6 Combine 80g of cocoa block, 25g of cocoa butter, 20g of coconut oil, and 15g or more of powdered erythritol in a mixing bowl. Gently heat the bowl until the cocoa block melts. Stir the mixture until all the ingredients are thoroughly combined. step 7 Using a fork or toothpick, dip each Ferrero Rocher ball into the melted chocolate, ensuring it is fully coated. Roll the coated Ferrero Rocher in crushed hazelnuts before refrigerating them. Return the coated Ferrero Rocher balls to the baking sheet and refrigerate for an additional 30 minutes to allow the chocolate coating to set. step 8 If desired, coat the Keto Ferrero Rocher with another layer of chocolate and chill it in the refrigerator for 30 minutes. step 9 Once the chocolate coating is firm, your homemade keto Ferrero Rocher chocolates are ready to be enjoyed! With this recipe for homemade keto Ferrero Rocher, you can satisfy your chocolate cravings while staying true to your keto lifestyle. Using flaxseed powder, cocoa, and coconut oil, you can create these irresistible treats that closely resemble the original Ferrero Rocher chocolates. By incorporating these keto-friendly ingredients, you not only indulge in decadence but also enjoy the health benefits they offer. From the heart-healthy flaxseed powder to the antioxidant-rich cocoa and the nourishing coconut oil, each ingredient plays a vital role in creating the perfect keto Ferrero Rocher. So, put on your apron, gather your ingredients, and get ready to experience chocolate bliss like never before. Enjoy! Pro Tips Roast the hazelnuts: Roasting the hazelnuts brings out their natural oils and intensifies their flavor. Simply spread the hazelnuts on a baking sheet and roast them in a preheated oven at 350°F (175°C) for 10-15 minutes, or until fragrant. Let them cool before using them in the recipe. Dip with care: When dipping the Ferrero Rocher into the melted chocolate, use a gentle touch to avoid any cracks or breakage. Ensure that the chocolate coating is smooth and even for a professional-looking finish. Use high-quality ingredients: Opt for organic flaxseed powder, unsweetened cocoa powder, and extra virgin coconut oil to achieve the best flavor and health benefits. Preserving Suggestions To keep your homemade keto Ferrero Rocher fresh and flavorful, store them in an airtight container in the refrigerator. They will last for up to two weeks, although they are unlikely to stick around for that long! When serving, remove the chocolates from the refrigerator a few minutes before enjoying to allow them to soften slightly. These delicious treats are perfect for gifting or indulging in whenever your sweet tooth strikes. Variations and Additions Nut-Free Option: If you have a nut allergy or prefer a different flavor, replace the roasted hazelnuts with roasted almonds or macadamia nuts. The result will be equally delightful. Almond Flour Substitute: If you don’t have flaxseed powder on hand, you can use almond flour as an alternative. The texture and flavor of the Ferrero Rocher may vary slightly, but they will still be delicious. Dark Chocolate Coating: For a richer, more intense flavor, substitute the milk chocolate coating with dark chocolate that has a high percentage of cacao. Dark chocolate also contains less sugar than milk chocolate, making it a suitable option for keto. Top Questions Can I make my own chocolate sauce? Combine cocoa power and coconut oil at a ratio of 1:1 to form your chocolate sauce, add erythritol powder for your preferred sweetness level. How many pieces of keto ferrero rocher can I make with the recipe? 12 keto ferrero rocher balls! Print keto ferrero rocher Course: DessertDifficulty: MediumServings 4 servingsPrep time 30 minutesCooking time 30 minutes Ingredients 60g flaxseed powder 80g sugar-free cocoa block 25g cocoa butter 30g coconut oil, melted 35g chocolate sauce 24 roasted hazelnuts powdered erythritol (or your preferred keto-friendly sweetener) Directions In a mixing bowl, combine the 60g flaxseed

chocolate strawberry bite
Celebrate Valentine’s Day with a sweet and delicious treat – chocolate strawberry bites! These irresistible bites are the perfect combination of juicy strawberries and rich, creamy chocolate. Whether you’re preparing them for a romantic evening or a fun treat for the family, these frozen delights are sure to impress. Why would you love this recipe for making chocolate strawberry bite? These bite-sized treats are the perfect combination of juicy strawberries and rich, creamy chocolate – a match made in dessert heaven! Ingredients Fresh strawberries Chocolate (dark, milk, or white) Directions step 1 Wash the strawberries under cool running water and pat them dry with a paper towel. Make sure they are completely dry before proceeding. step 2 Frozen your strawberries for 25 -30 minutes. step 3 Melt the chocolate using a double boiler. If using a double boiler, place the chocolate in a heatproof bowl over a pot of simmering water and stir until melted. step 4 Hold the strawberry with a bamboo stick and dip it into the melted chocolate, swirling it around to ensure even coverage. Allow any excess chocolate to drip off. Once all the strawberries are dipped, place the baking sheet in the freezer for about 30 minutes, or until the chocolate has hardened. If you’re looking for more sweet treats to celebrate Valentine’s Day, here are a few ideas to consider: – Red Velvet Cupcakes: These rich and velvety cupcakes topped with cream cheese frosting are a classic Valentine’s Day dessert. – Molten Lava Cake: Indulge in a warm and gooey chocolate lava cake with a molten center. This decadent dessert is perfect for sharing. – Heart-shaped Sugar Cookies: Bake heart-shaped sugar cookies and decorate them with royal icing. These cookies are not only delicious but also make a thoughtful gift. Pro Tips It’s important to choose ripe and firm strawberries for this recipe. You want them to be sweet and flavorful, but not too soft that they become mushy when frozen. Look for strawberries that are bright red and fragrant, ensuring maximum taste and freshness. When it comes to dipping the strawberries in chocolate, make sure to wash and dry them thoroughly beforehand. Any excess moisture can prevent the chocolate from adhering properly, resulting in a less-than-perfect bite. Gently pat the strawberries dry with a paper towel, taking care not to bruise or damage them. If you’re short on time, you can speed up the setting process by placing the chocolate-covered strawberries in the freezer for a shorter amount of time, around 15-20 minutes. Just keep an eye on them to prevent them from freezing too much. Serving Suggestions Serve the frozen chocolate strawberry bites straight from the freezer for a refreshing and indulgent treat. They can be enjoyed on their own or paired with a dollop of whipped cream or a scoop of vanilla ice cream. If you’re planning to serve them at a party or gathering, arrange the frozen chocolate strawberry bites on a platter or in a decorative bowl. This will make them look even more enticing and encourage your guests to try them. To store any leftover frozen chocolate strawberry bites, place them in an airtight container or a resealable plastic bag and keep them in the freezer. They will stay fresh for up to one week. Variations and Additions White Chocolate Raspberry: Instead of dipping the strawberries in plain chocolate, melt white chocolate and mix in some freeze-dried raspberries for a burst of fruity flavor and a beautiful pink color. Almond Joy: After dipping the strawberries in chocolate, sprinkle them with shredded coconut and a small piece of almond. This variation adds a tropical twist to the classic combination of chocolate and strawberries. Chocolate Lover’s Dream: Dip the strawberries in dark chocolate, then drizzle them with melted milk chocolate and white chocolate. This variation is perfect for those who can’t get enough chocolate in their desserts. Peanut Butter Chocolate: Dip the strawberries in melted milk or dark chocolate, then drizzle them with melted peanut butter. The combination of peanut butter and chocolate is a match made in heaven. Top Questions Can I use frozen strawberries instead of fresh ones? While you can use frozen strawberries, keep in mind that they will have a softer texture when thawed. This may affect the overall texture of the frozen chocolate strawberry bites. Can I use chocolate chips instead of melting chocolate? Yes, you can use chocolate chips. However, chocolate chips contain stabilizers that help them retain their shape when baked. This means that the melted chocolate may be thicker and harder to work with. If using chocolate chips, you may need to add a small amount of vegetable oil or shortening to the chocolate to achieve a smoother consistency. Can I use other fruits instead of strawberries? Absolutely! While strawberries are a classic choice, you can experiment with other fruits like bananas, pineapple chunks, or even cherries. Just make sure to adjust the dipping and freezing times accordingly, as different fruits may require different preparation methods. Print chocolate strawberry bite Course: SnacksDifficulty: EasyServings 2 servingsPrep time 10 minutesCooking time 20 minutes Ingredients Fresh strawberries Chocolate (dark, milk, or white) Directions Wash the strawberries under cool running water and pat them dry with a paper towel. Make sure they are completely dry before proceeding. Frozen your strawberries for 25 -30 minutes. Melt the chocolate using a double boiler. If using a double boiler, place the chocolate in a heatproof bowl over a pot of simmering water and stir until melted. Hold the strawberry with a bamboo stick and dip it into the melted chocolate, swirling it around to ensure even coverage. Allow any excess chocolate to drip off. Once all the strawberries are dipped, place the baking sheet in the freezer for about 30 minutes, or until the chocolate has hardened. Popular Articles All Post Dessert Earl Grey Shortbread Cookies May 2, 2024/No Comments Apple Pie Ring May 2, 2024/1 Comment Soft Heart Chocolate Cookie May 2, 2024/2 Comments Plain Yogurt Cake May 2, 2024/3 Comments Oreo Tiramisu May

Earl Grey Shortbread Cookies
Indulge in the delicate flavors of earl grey tea with these irresistible earl grey shortbread cookies. Combining the rich, buttery goodness of traditional shortbread with the subtle citrusy notes of aromatic earl grey, these cookies are a treat for the senses. In this article, we will guide you through the simple steps to make your own batch of these delightful cookies. Why would you love this recipe for making earl grey shortbread cookies ? 🍪✨ These melt-in-your-mouth treats are the perfect balance of buttery goodness and crumbly texture. Get ready to bake up some happiness! 😋 Ingredients 2 cups of all-purpose flour 1 cup (2 sticks) unsalted butter, softened half egg yolk ½ cup powdered sugar 2 tablespoons loose earl grey tea leaves (or 4 earl grey tea bags) ½ teaspoon salt Directions step 1 In a large mixing bowl, combine the butter, powdered sugar, and salt. Mix until well combined and creamy. step 2 Add ½ of the egg yolk to the mixture and continue to combine. step 3 Gradually add the flour and grinded earl grey tea leaves to the butter mixture, stirring until a crumbly dough forms. Use your hands to bring the dough together, kneading gently until it becomes smooth and cohesive. step 4 Wrap the dough in plastic wrap and refrigerate for at least 1 hour, or until firm. Once the dough has chilled, remove it from the refrigerator and let it sit at room temperature for a few minutes to soften slightly. Roll out the dough to a stick and coat with a layer of granulated sugar. step 5 Divide the dough stick to small disks using a knife. Use cookie cutters to cut out your desired shapes and transfer the cookies to the prepared baking sheet, spacing them about 1 inch apart. Preheat your oven to 350°F (175°C) and proceed to baking. step 6 Bake the cookies for 12-15 minutes, or until the edges are lightly golden. Once baked, remove the cookies from the oven and let them cool on the baking sheet for a few minutes before transferring them to a wire rack to cool completely. Enjoy your homemade earl grey shortbread cookies! They are perfect on their own or paired with a cup of tea. Pro Tips To ensure the best flavor, use high-quality earl grey tea leaves or tea bags. The better the tea, the better the cookies will taste. For a more pronounced tea flavor, you can grind the loose tea leaves in a coffee grinder before infusing the butter. This will release more of the tea’s aromatic oils. Storing and Preserving Earl Grey Shortbread Cookies To keep your earl grey shortbread cookies fresh and delicious, follow these storage tips: Store the cookies in an airtight container at room temperature for up to one week. If you live in a humid climate, you may want to add a slice of bread to the container to help absorb any excess moisture and keep the cookies crisp. If you prefer a softer texture, you can store the cookies in a sealed container with a slice of apple, which will help keep them moist. To extend the shelf life, you can freeze the cookies in an airtight container for up to three months. Thaw them at room temperature before enjoying. Variations and Additions While the classic earl grey shortbread cookies are delicious on their own, you can also experiment with different variations and additions to customize the flavors. Here are a few ideas to spark your creativity: Lemon Zest: Add the zest of one lemon to the dough for a bright and citrusy twist. Lavender: Infuse the butter with a tablespoon of culinary lavender along with the earl grey tea for a floral undertone. Dark Chocolate Drizzle: Melt some dark chocolate and drizzle it over the cooled cookies for an indulgent touch. Earl Grey Glaze: Mix powdered sugar with a small amount of brewed earl grey tea to create a glaze and drizzle it over the cookies for added sweetness and flavor. Serving Suggestions Earl grey shortbread cookies are a delightful treat to enjoy on their own, but they also pair well with a variety of accompaniments. Here are a few serving suggestions to enhance your cookie experience: Afternoon Tea: Serve the cookies alongside a steaming pot of earl grey tea for a harmonious tea time pairing. Ice Cream Sandwiches: Sandwich a scoop of your favorite ice cream between two cookies for a cool and creamy dessert. Fruit Compote: Top the cookies with a spoonful of your favorite fruit compote or jam for a burst of fruity sweetness. Whipped Cream: Serve the cookies with a dollop of freshly whipped cream and a sprinkle of earl grey tea leaves for an elegant dessert. Top Questions Can I use salted butter instead of unsalted butter? While you can use salted butter, it’s best to use unsalted butter to have more control over the saltiness of the cookies. Adjust the amount of salt accordingly if using salted butter. Can I substitute the all-purpose flour with another type of flour? All-purpose flour works best for this recipe, as it provides the desired texture and structure. Substituting with other flours may yield different results. Print Earl Grey Shortbread Cookies Course: SnacksDifficulty: EasyServings 4 servingsPrep time 30 minutesCooking time 20 minutes Ingredients 2 cups of all-purpose flour 1 cup (2 sticks) unsalted butter, softened half egg yolk ½ cup powdered sugar 2 tablespoons loose earl grey tea leaves (or 4 earl grey tea bags) ½ teaspoon salt Directions In a large mixing bowl, combine the butter, powdered sugar, and salt. Mix until well combined and creamy. Add ½ of the egg yolk to the mixture and continue to combine. Gradually add the flour and grinded earl grey tea leaves to the butter mixture, stirring until a crumbly dough forms. Use your hands to bring the dough together, kneading gently until it becomes smooth and cohesive. Wrap the dough in plastic wrap and refrigerate for at least 1 hour, or

Apple Pie Ring
This showstopper dessert is not only visually stunning but also incredibly tasty. And with a few pro tips and tricks, you’ll be able to create a masterpiece that will leave everyone in awe. Why would you love this recipe for making puff pastry apple pie rings? Puff pastry is a versatile ingredient that can elevate any dish, and when it comes to making an Apple Pie Ring, using puff pastry is a game-changer. Here are a few reasons why: Flaky and Buttery Texture: Puff pastry is known for its delicate layers that puff up when baked, creating a light and airy texture. The buttery flavor adds richness to the pie, making each bite a heavenly experience. Time-Saver: Making puff pastry from scratch can be a laborious process. By opting for store-bought puff pastry, you save yourself the hassle without compromising on taste. Consistent Results: Store-bought puff pastry ensures consistent quality, so you can be confident that your Apple Pie Ring will turn out perfectly every time. Ingredients 2 sheets of store-bought puff pastry, thawed 3-4 medium-sized apples, peeled, cored, and thinly sliced 1/2 cup granulated sugar 1 egg, beaten (for egg wash) Directions step 1 Prepare the apple rings. Peel, core and slice the apples to thin layer. step 2 Using a sharp knife, devide the puff pastry to thin strips (about 4cm wide) . step 3 Wire the apple slice with the puff pastry strips. Press the edges of the two strips together to seal the pie ring. Drizzle a layer of sugar or syrup over the apple slices before sealing the pie if you crave for sweetness! step 4 Brush the beaten egg over the top of the pastry to give it a glossy finish. Garnish with some black sesame on the top. step 5 Preheat your oven to 375°F (190°C) and line a baking sheet with parchment paper. Bake the Apple Pie Ring for 20-30 minutes, or until the pastry is golden brown and crisp. Pro Tips Make sure to thaw the puff pastry according to the package instructions to ensure it’s pliable and easy to work with. When assembling the puff pastry Apple Pie Ring, it’s important to work quickly to prevent the dough from becoming too warm. Puff pastry relies on layers of butter to create its flaky texture, and if the butter melts before baking, you won’t achieve that desired result. Keep your puff pastry chilled until you’re ready to use it, and work on a cool surface if possible. Use firm and slightly tart apples such as Granny Smith or Honeycrisp for the best flavor and texture. Serving Suggestions Serve the puff pastry Apple Pie Ring warm or at room temperature. It pairs beautifully with a scoop of vanilla ice cream or a dollop of whipped cream. Leftovers can be stored in an airtight container at room temperature for up to 2 days. To reheat, place the pie ring in a preheated oven at 350°F (175°C) for a few minutes until warmed through. Variations and Additions While the classic puff pastry Apple Pie Ring is a delight on its own, you can experiment with different flavor combinations and additions to customize your dessert: Caramel Apple: Drizzle caramel sauce over the apple slices before sealing the pie for an extra indulgent treat. Nutty Delight: Sprinkle chopped nuts, such as pecans or walnuts, over the apple filling to add a delightful crunch. Spiced Twist: Add a pinch of nutmeg or cloves to the cinnamon-sugar mixture for a warm and aromatic twist. Top Questions Can I freeze the apple pie rings? Yes, you can freeze the unbaked Apple Pie Ring for up to 3 months. Simply wrap it tightly in plastic wrap and aluminum foil before placing it in the freezer. When ready to bake, thaw it in the refrigerator overnight before following the baking instructions. Can I use home made puff pastry? Absolutely! If you have the time and inclination, homemade puff pastry can be used for an extra special touch. Just be sure to follow a trusted recipe for best results. Print Apple Pie Ring Course: SnacksDifficulty: EasyServings 2 servingsPrep time 20 minutesCooking time 30 minutes Ingredients 2 sheets of store-bought puff pastry, thawed 3-4 medium-sized apples, peeled, cored, and thinly sliced 1/2 cup granulated sugar 1 egg, beaten (for egg wash) Directions Prepare the apple rings. Peel, core and slice the apples to thin layer. Using a sharp knife, devide the puff pastry to thin strips (about 4cm wide) . Wire the apple slice with the puff pastry strips. Press the edges of the two strips together to seal the pie ring. Drizzle a layer of sugar or syrup over the apple slices before sealing the pie if you crave for sweetness! Brush the beaten egg over the top of the pastry to give it a glossy finish. Garnish with some black sesame on the top. Preheat your oven to 375°F (190°C) and line a baking sheet with parchment paper. Bake the Apple Pie Ring for 20-30 minutes, or until the pastry is golden brown and crisp. Popular Articles All Post Dessert Apple Pie Ring May 2, 2024/No Comments Soft Heart Chocolate Cookie May 2, 2024/1 Comment Plain Yogurt Cake May 2, 2024/2 Comments Oreo Tiramisu May 2, 2024/3 Comments Cocoa Crepes Cake May 2, 2024/3 Comments Oreo Cheesecake May 1, 2024/5 Comments Newsletter JOIN OUR NEWSLETTER Email Address By subscribing, I consent to receive promotional emails from this site and agree with our privacy policy. Categories Celebrate (3) Dessert (7) Digital (10) Favorites (21) Gardening (3) Outfits (3) Skin Care (5) Edit Template Don't Miss Apple Pie Ring Soft Heart Chocolate Cookie Plain Yogurt Cake Oreo Tiramisu Cocoa Crepes Cake Oreo Cheesecake caramel cream puff Show Your Love: 100+ Irresistible Gift Ideas for Mom that Will Make Her Heart Melt white nail ideas 9 Best Anti-Aging Face Creams 2024 Secret to Ageless Beauty Top
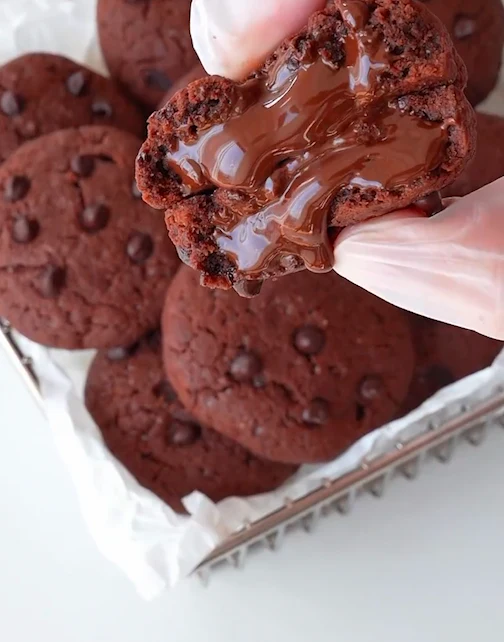
Soft Heart Chocolate Cookie
Are you craving for a delicious and indulgent treat? Look no further because I have the ultimate recipe for soft-heart chocolate cookies that will make your taste buds dance with joy! These cookies are guaranteed to satisfy even the most intense chocolate cravings. Get ready to embark on a culinary adventure as we dive into the step-by-step process of creating these mouthwatering treats. Baking chocolate chip cookies becomes a fairly easy task once you acquire the necessary skills, and they require minimal baking time. It may be tempting to immediately place the freshly mixed dough in the oven, but it is crucial to exercise patience and wait for optimal results. Read the Pro Tip at the end of the article before you proceed to bake! What do we need for making soft heart chocolate cookies? You will need butter, sugar or brown sugar, eggs, all-purpose flour or low gluten flour, cocoa powder, baking powder, salt, and of course, plenty of chocolate chips. The combination of these ingredients is what creates the soft and gooey texture that makes these cookies truly irresistible. Ingredients 1 egg 1 teaspoon of vanilla abstract 70g butter 50g sugar 120g low gluten flour 2g baking powder 10g cocoa powder Directions step 1 In a large mixing bowl, cream together the butter, sugar and egg until light and fluffy. Followed by the vanilla extract if that’ s your favorite. Mix until well combined. step 2 Gradually add the dry ingredients to the wet ingredients, whisk together the low gluten flour, cocoa powder, baking powder, and salt, mixing just until incorporated. Be careful not to overmix as this can result in tough cookies. step 3 Roll the dough into a a firm state. step 4 Now comes the fun part – adding the chocolate chips! Fold in a chocolate chip as your heart desires. This is where you can truly make these cookies your own by using different types of chocolate chips such as milk chocolate, dark chocolate, or even white chocolate. step 5 Using a cookie scoop or tablespoon, drop rounded spoonfuls of dough onto the prepared baking sheet. Make sure to leave enough space between each cookie as they will spread while baking. If desired, gently press a few extra chocolate chips onto the tops of each cookie for an extra burst of chocolate goodness. step 6 Bake in the preheated oven for approximately 10-12 minutes or until the edges are set but the centers still look slightly undercooked. This is what gives these cookies their irresistibly soft and gooey center. Allow the cookies to cool on the baking sheet for a few minutes before transferring them to a wire rack to cool completely. step 7 Once cooled, grab a glass of milk and indulge in these heavenly soft heart chocolate cookies. The combination of rich chocolate and melt-in-your-mouth texture will have you coming back for seconds (and maybe even thirds!). Pro Tips Like many other baked goods, you will want to allow the dough to rest before baking. You only need to let the dough rest for as little as 30 minutes. Consider it a step in the process as you clean up and put all of the baking tools away. But by allowing the dough to rest in the refrigerator, the cookies will turn out nice and chewy. Adding sea salt to your chocolate cookies serves a dual purpose. The combination of sweet and salty flavors creates a harmonious taste. If you haven’t tried sprinkling sea salt flakes on top of your chocolate chip cookies, I highly recommend giving it a go. Achieving the ideal cookie texture relies heavily on properly combining the butter and sugar. To accomplish this, it is crucial to thoroughly mix the butter and sugar for a significant amount of time. It is important not to underestimate the duration required for this step. Top Questions Is it possible to store this dough in the refrigerator for a couple of days? The short answer is Yes. Just make sure to allow it to come to room temperature before shaping and baking. In fact, giving it some time in the fridge might enhance the flavor of the chocolate cookies as it allows the spice blend to fully develop. How to get the chocolate fillings soft again once the cookies cooled down? To enhance your eating experience, consider warming a small portion of chocolate cookies in the microwave for just 5 seconds prior to consumption, allowing the chocolate to melt slightly and create a gooey texture that will make every bite even more indulgent. Popular Articles All Post Dessert Soft Heart Chocolate Cookie May 2, 2024/No Comments Plain Yogurt Cake May 2, 2024/1 Comment Oreo Tiramisu May 2, 2024/2 Comments Cocoa Crepes Cake May 2, 2024/3 Comments Oreo Cheesecake May 1, 2024/4 Comments caramel cream puff April 30, 2024/ Newsletter JOIN OUR NEWSLETTER Email Address By subscribing, I consent to receive promotional emails from this site and agree with our privacy policy. Categories Celebrate (3) Dessert (6) Digital (10) Favorites (21) Gardening (3) Outfits (3) Skin Care (5) Edit Template Don't Miss Soft Heart Chocolate Cookie Plain Yogurt Cake Oreo Tiramisu Cocoa Crepes Cake Oreo Cheesecake caramel cream puff Show Your Love: 100+ Irresistible Gift Ideas for Mom that Will Make Her Heart Melt white nail ideas 9 Best Anti-Aging Face Creams 2024 Secret to Ageless Beauty Age Gracefully: Unlock the Magic of Anti-Aging Ingredients for Timeless Beauty Top